
In today’s dynamic entertainment landscape, Internet Protocol Television (IPTV) has emerged as a compelling alternative to traditional cable and satellite subscriptions. By leveraging your internet connection, IPTV allows you to stream live TV channels and on-demand content, offering greater flexibility and potentially significant cost savings.
This comprehensive guide empowers you to harness the potential of IPTV by providing a detailed roadmap for setting it up on Kodi, a popular open-source media center application.
Demystifying IPTV: What it is and How it Works?
At its core, IPTV functions by delivering television channels and content directly through your internet connection, bypassing the need for cable or satellite infrastructure. Instead of relying on dedicated physical cables, IPTV streams content via protocols like IP (Internet Protocol), allowing for greater flexibility and potentially wider accessibility.
Here’s a breakdown of the key aspects of IPTV:
- Delivery method: Employs the internet connection to deliver content.
- Content: Includes live TV channels, on-demand content, and catch-up services.
- Benefits: Potential cost savings, wider channel selection (depending on the provider), and flexibility in terms of device compatibility.
Why Integrate IPTV with Kodi? Exploring the Advantages:
Kodi, renowned for its ability to manage extensive media libraries, can be transformed into a full-fledged IPTV hub, unlocking a multitude of advantages:
- Centralized entertainment: Unify your live TV, on-demand content, and personal media library within a single, user-friendly interface.
- Customization prowess: Kodi boasts extensive customization options. Personalize your viewing experience with custom skins, add-ons, and settings tailored to your preferences.
- Cost-effectiveness: While IPTV service fees apply, they can be significantly cheaper than traditional cable or satellite subscriptions, making it a budget-friendly alternative.
- Electronic Program Guide (EPG): Access detailed program information and schedules for your IPTV channels.
- Recording capabilities: Schedule recordings of your favorite shows or live events using Kodi’s built-in recording functionality.
- Parental controls: Implement parental controls to restrict access to specific channels or content based on age or content rating.
These advanced features allow you to personalize your IPTV experience to a greater extent, catering to your individual preferences and viewing habits.
How to Setup IPTV on Kodi Addons:
Before embarking on this journey, it’s crucial to understand that Kodi itself does not provide IPTV channels. You’ll require an M3U playlist (a file containing channel information) from a reputable IPTV provider.
Here’s a step-by-step guide to setting up IPTV on Kodi:
1. Install the PVR IPTV Simple Client:
- Launch Kodi and click the “Settings Gear” in the top-left corner.
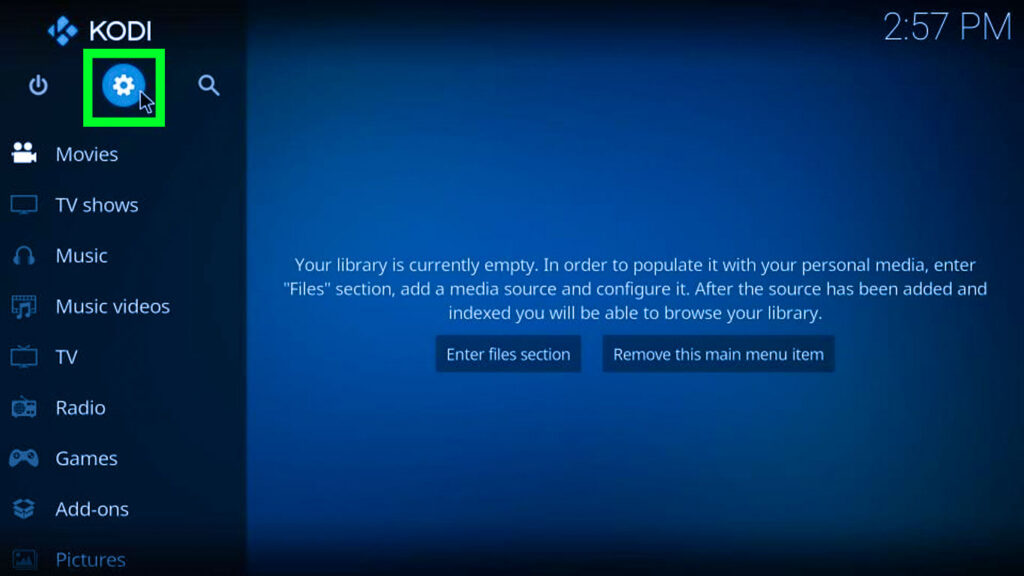
2. Select “Add-ons”.
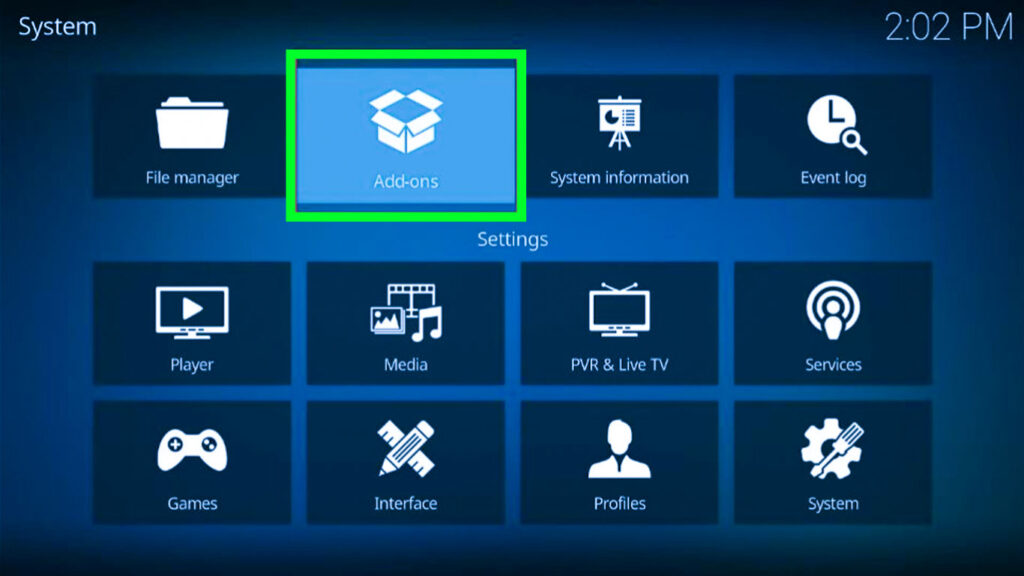
3. then click on “Install from repository”.
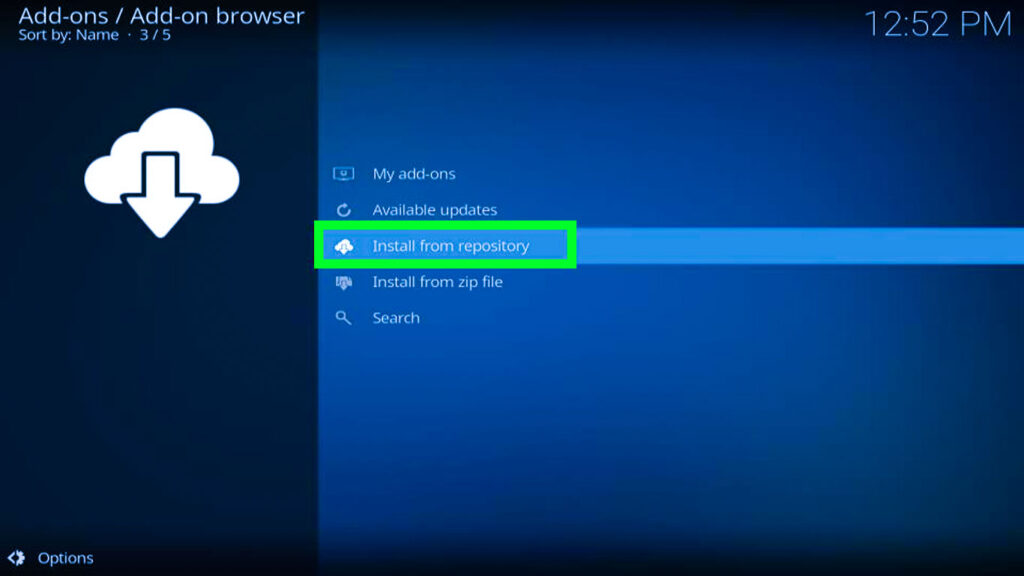
4. Choose “All repositories”.
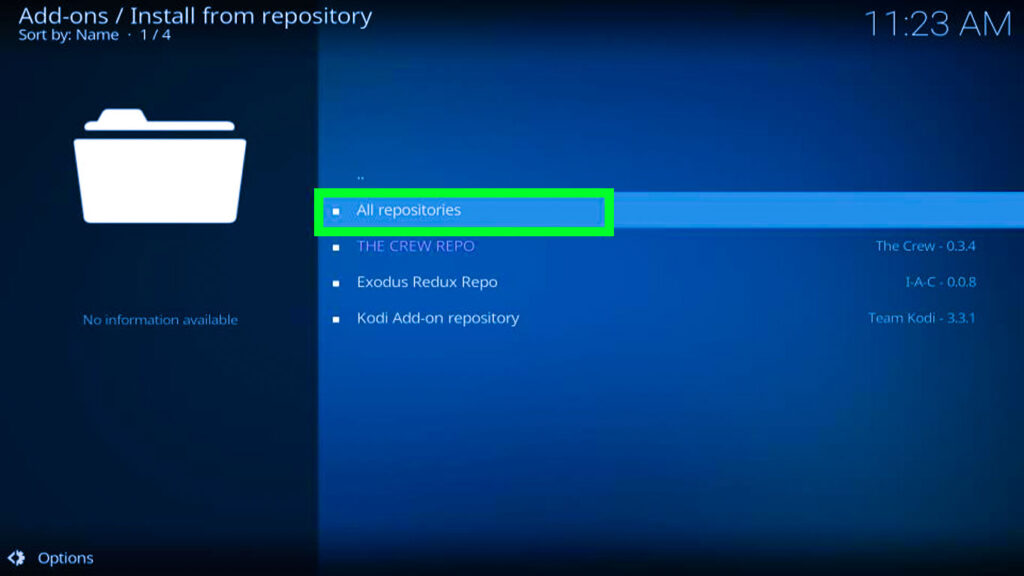
5. Now scroll down to “PVR clients”.
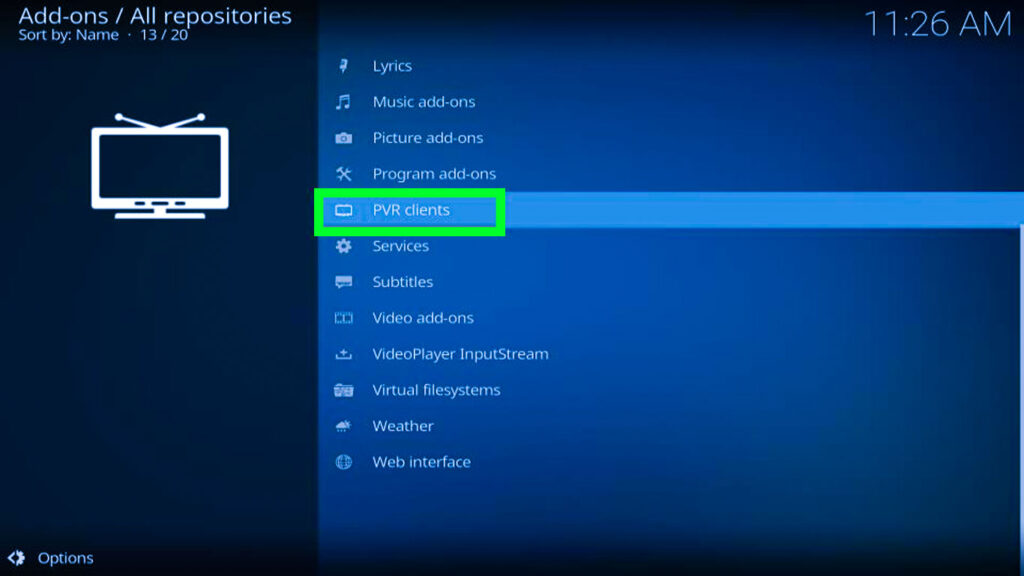
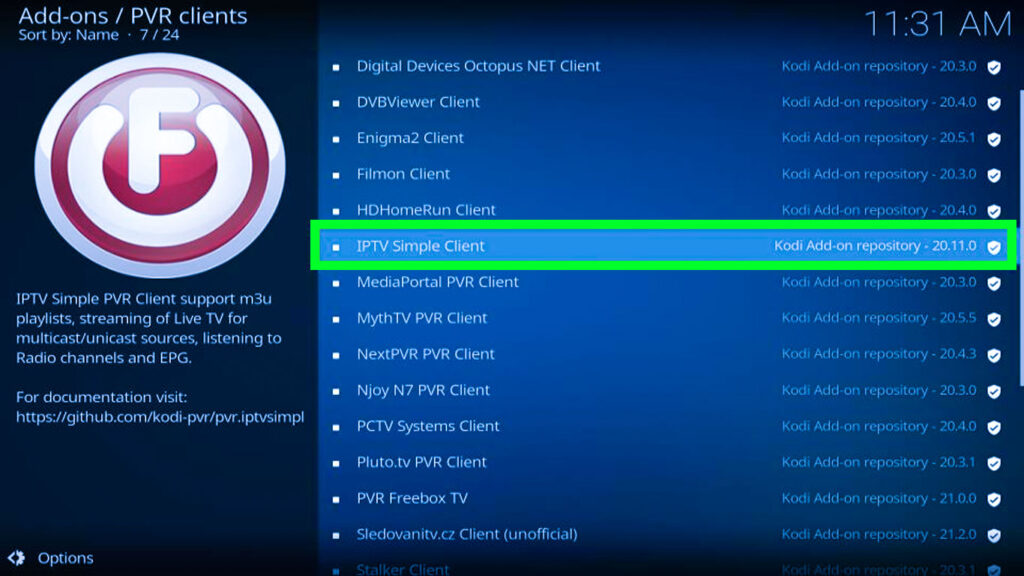
6. Find “PVR IPTV Simple Client”, and click it.
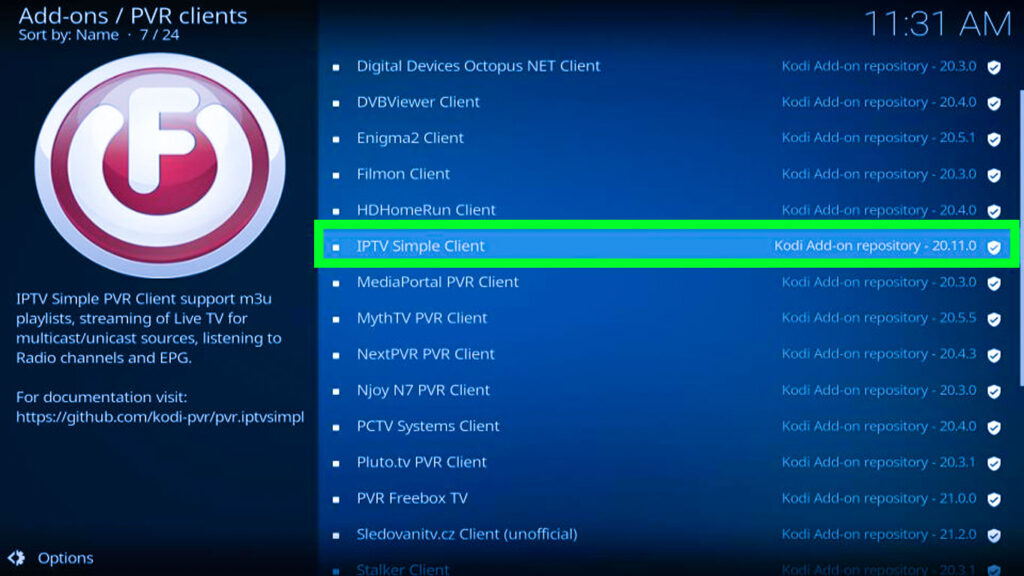
7. Now select “Install”.
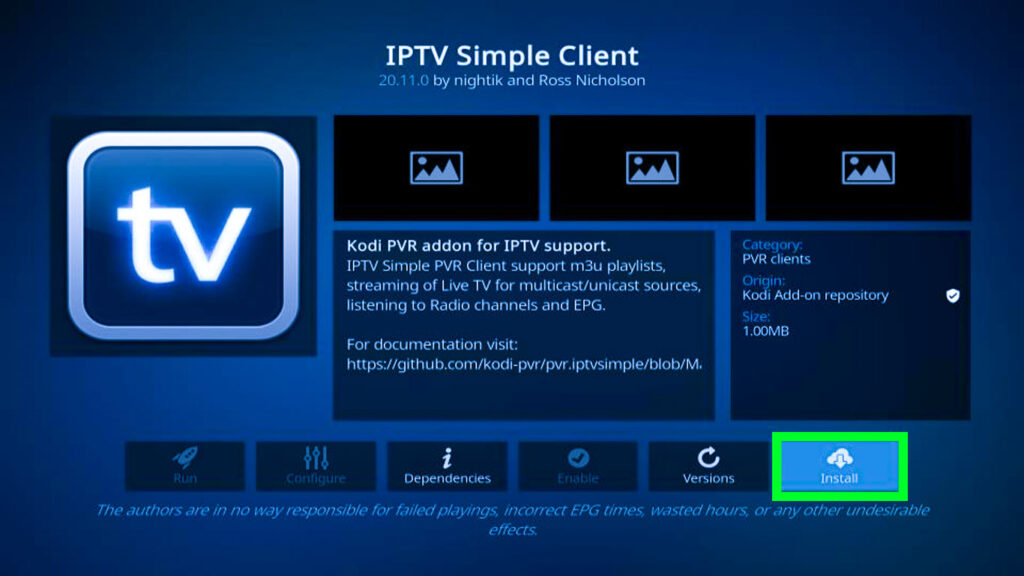
8. Click “OK” to install any required dependencies.
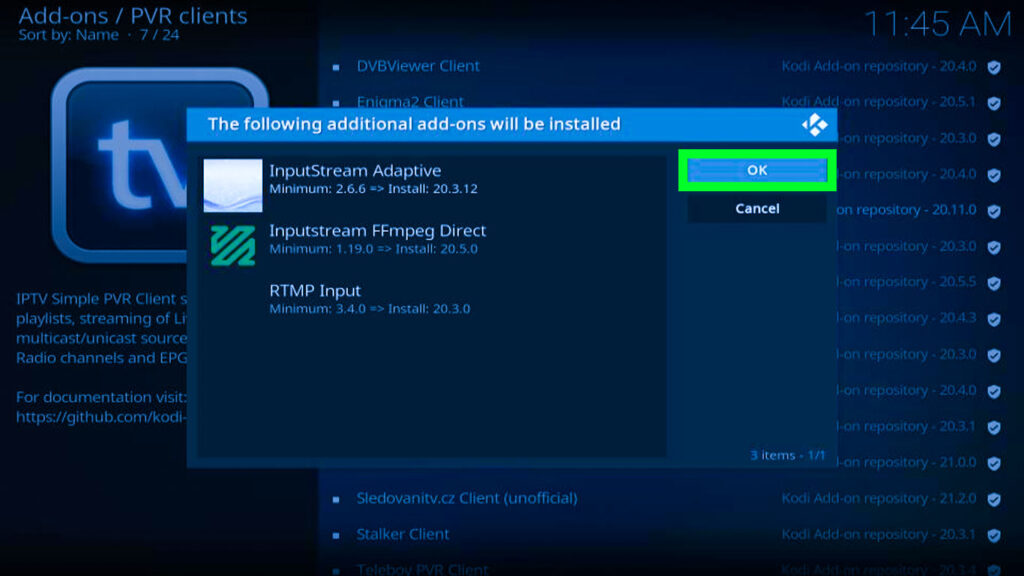
9. Right now PVR IPTV Simple Client will start downloading on your Kodi.
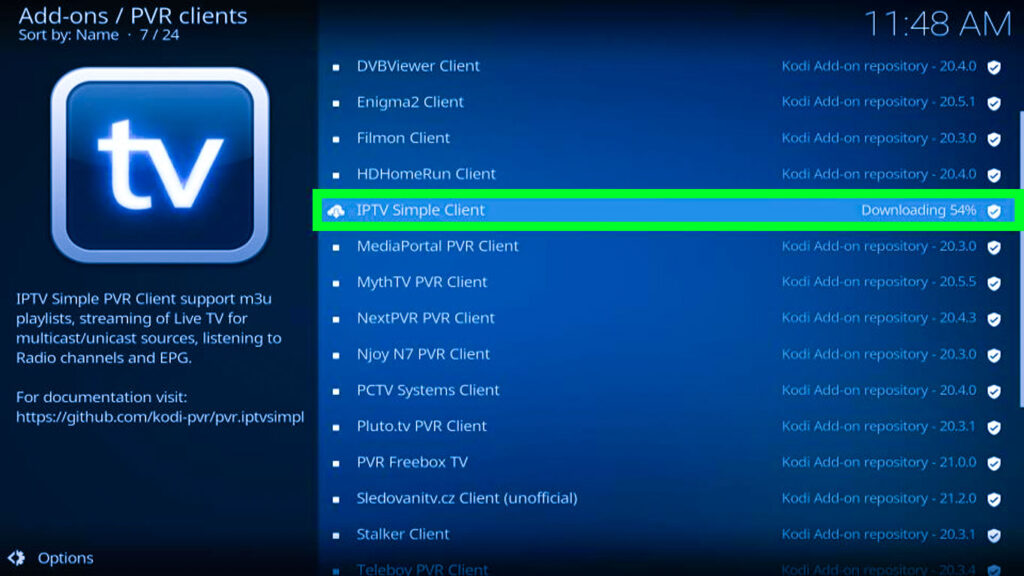
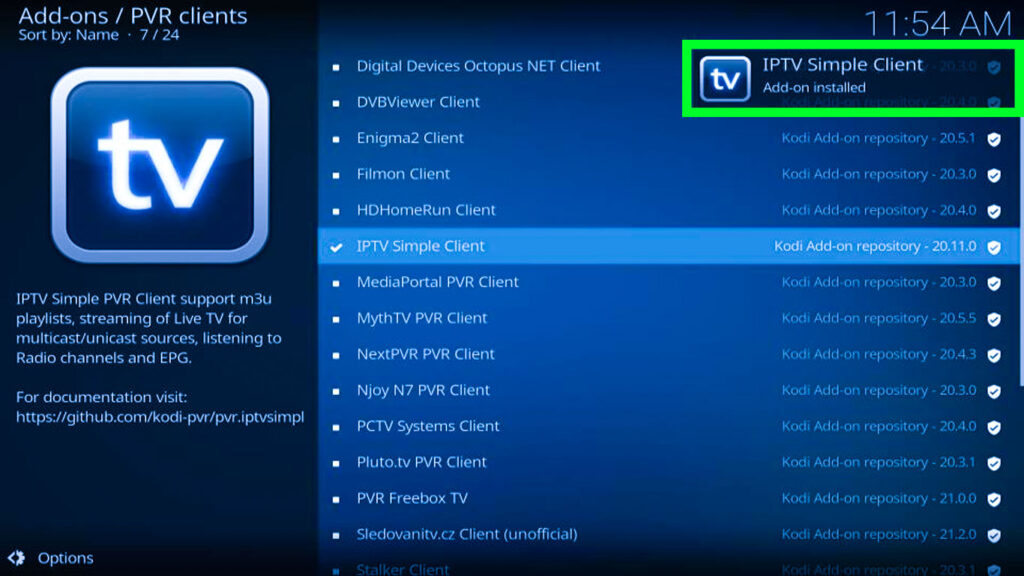
10. Wait for the download and confirmation of the “Add-on installed”.
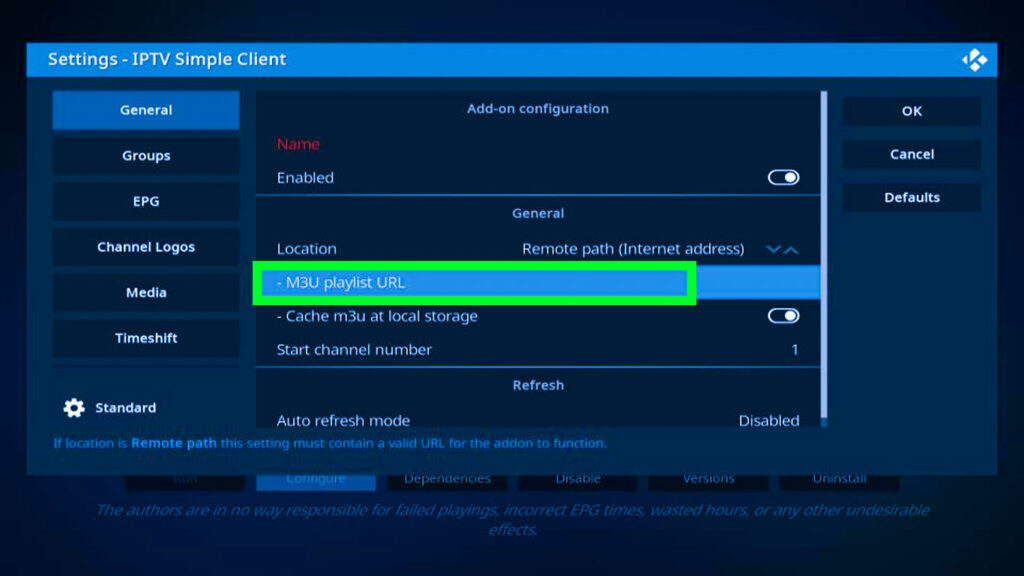
2. Add an M3U Playlist:
- From the Add-ons screen, select “PVR IPTV Simple Client”.
2. Click “Configure” on the addon’s dashboard.
3. Go to the “General” tab.
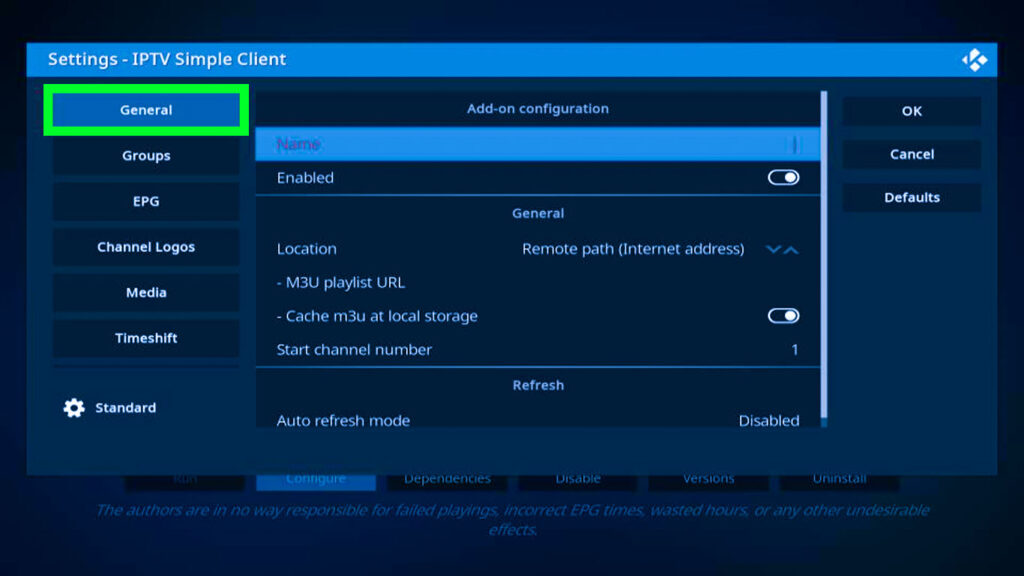
4. Now scroll down to the “M3U playlist URL”.
5. Enter your own M3U playlist URL or use the example provided: “https://iptv-org.github.io/iptv/index.m3u”.
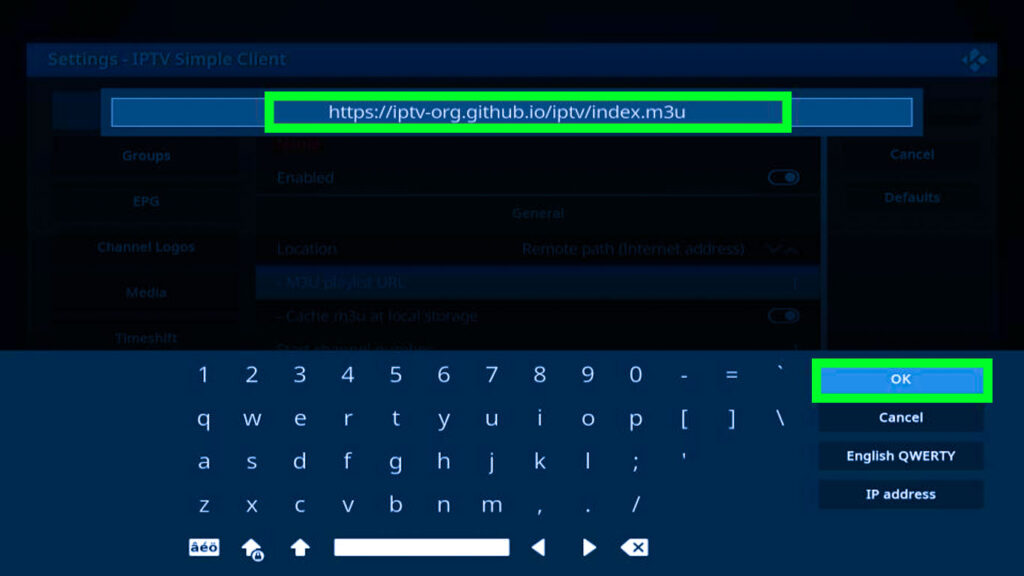
6. Click “OK” on both the pop-up and main configuration window.
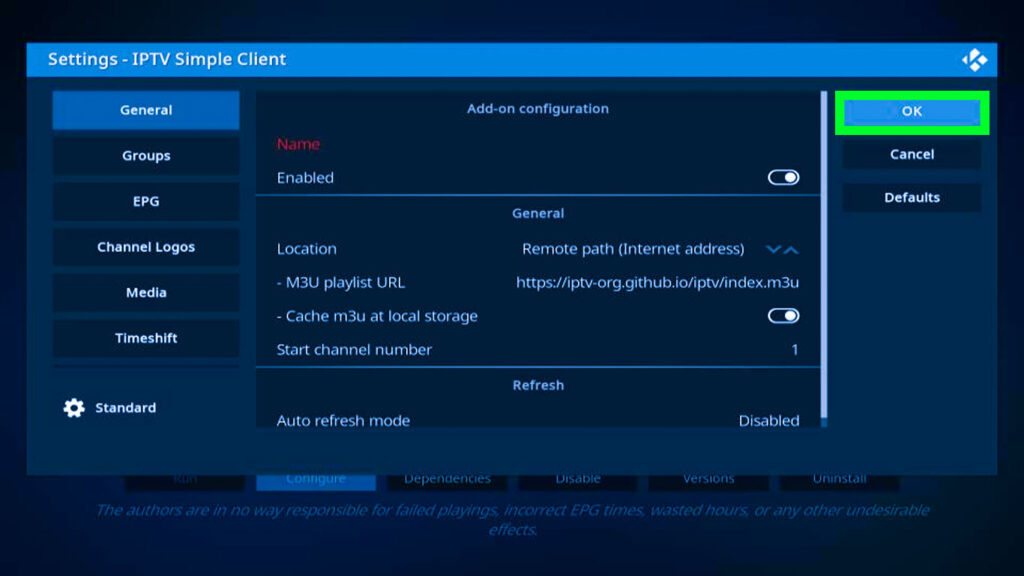
7. Exit and restart Kodi.
3. Enjoying IPTV:
- After restarting, Kodi will automatically launch PVR IPTV Simple Client.
- Wait for the addon to import channels from the M3U playlist.
- Navigate to the “TV” tab in Kodi.
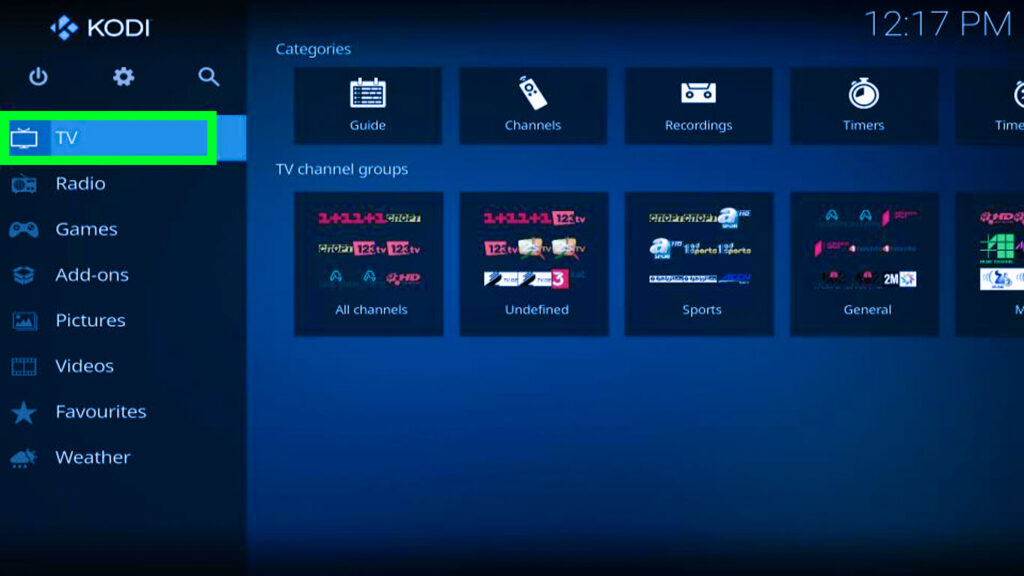
4. Click “Channels” on the right.
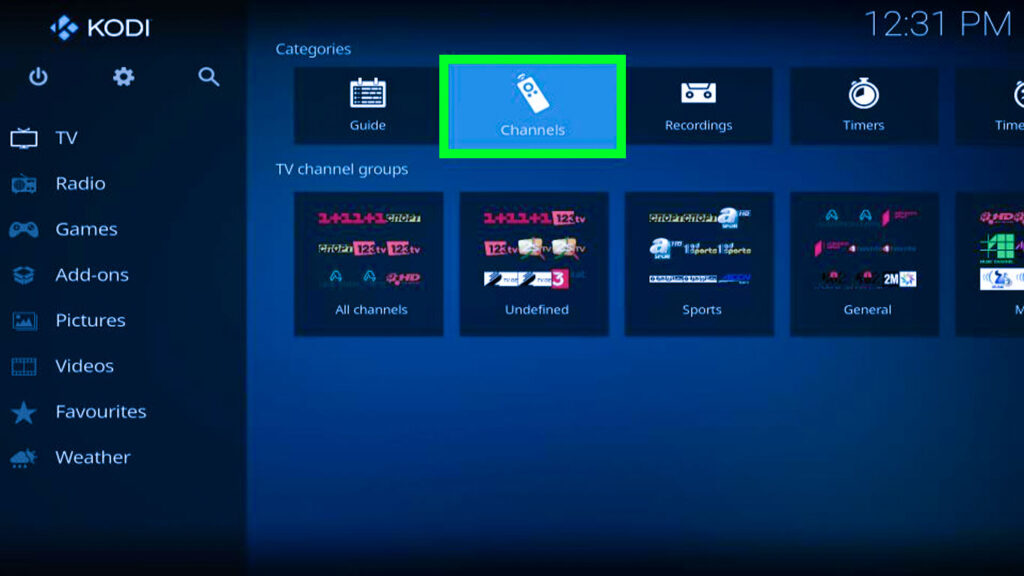
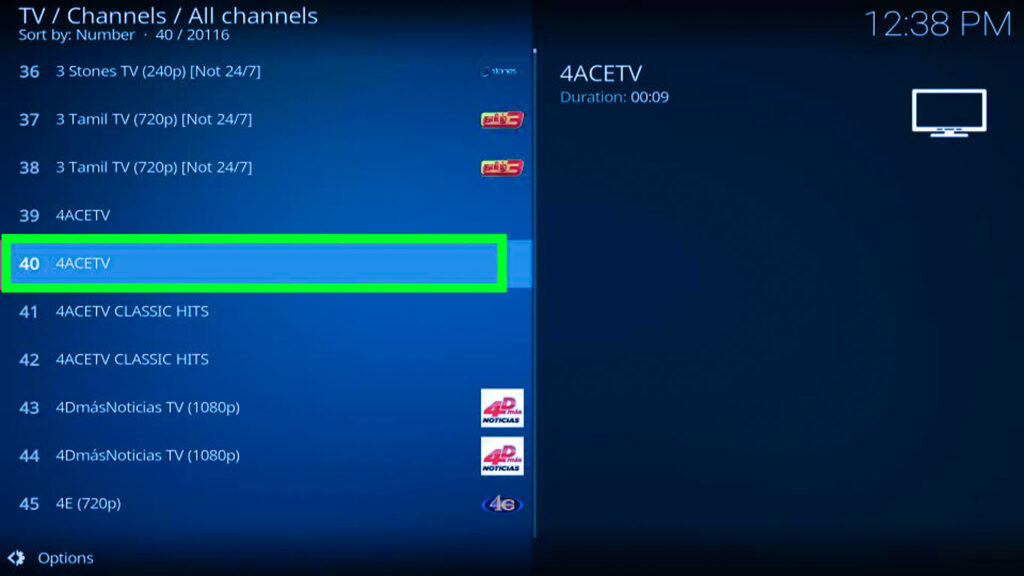
5. You can see the list of available channels.
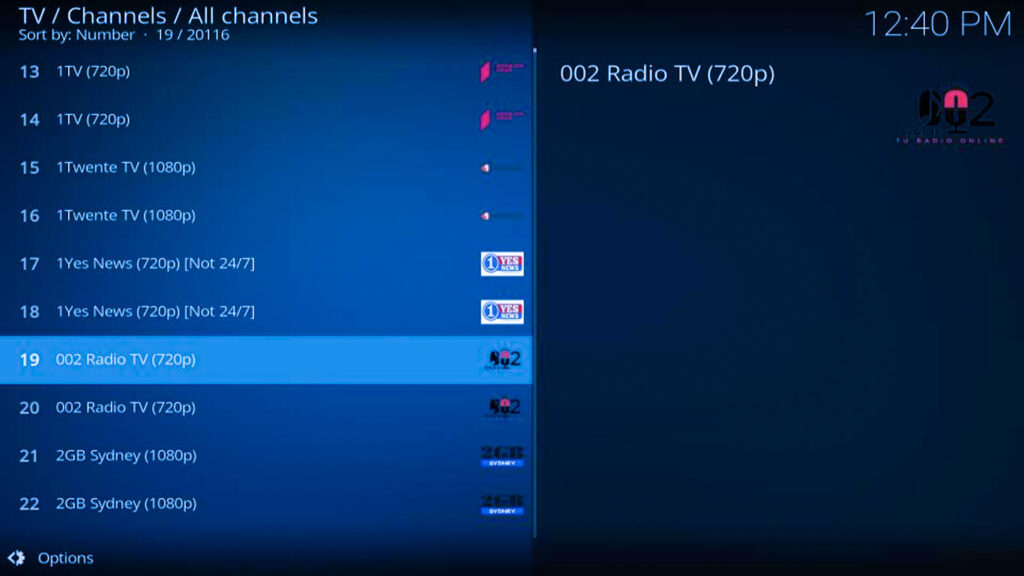
6. Select a channel and enjoy your IPTV experience!
Additional Tips:
- Explore the “TV Channels Groups” section for categorized channel browsing.

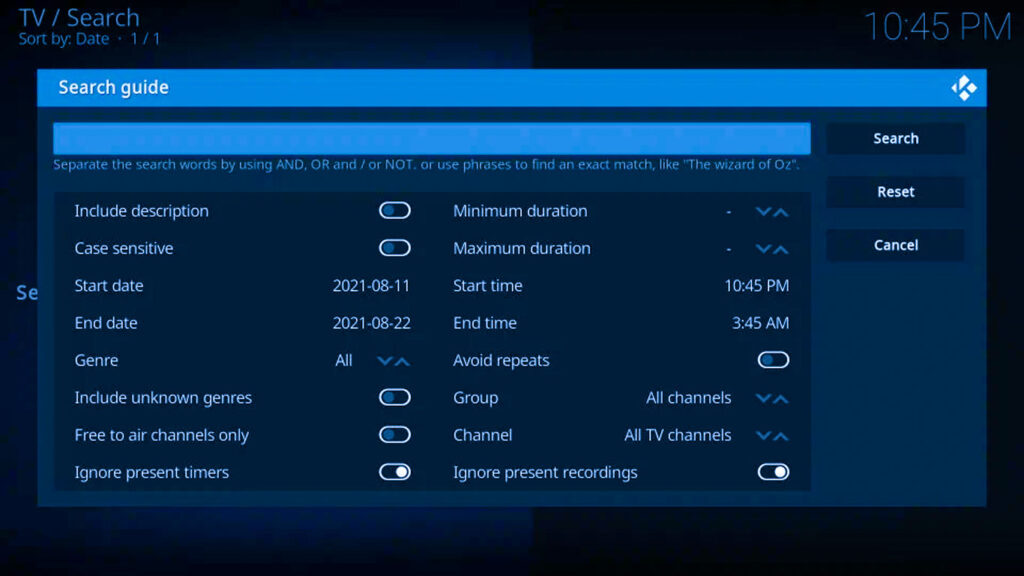
- Use the “Search” option.
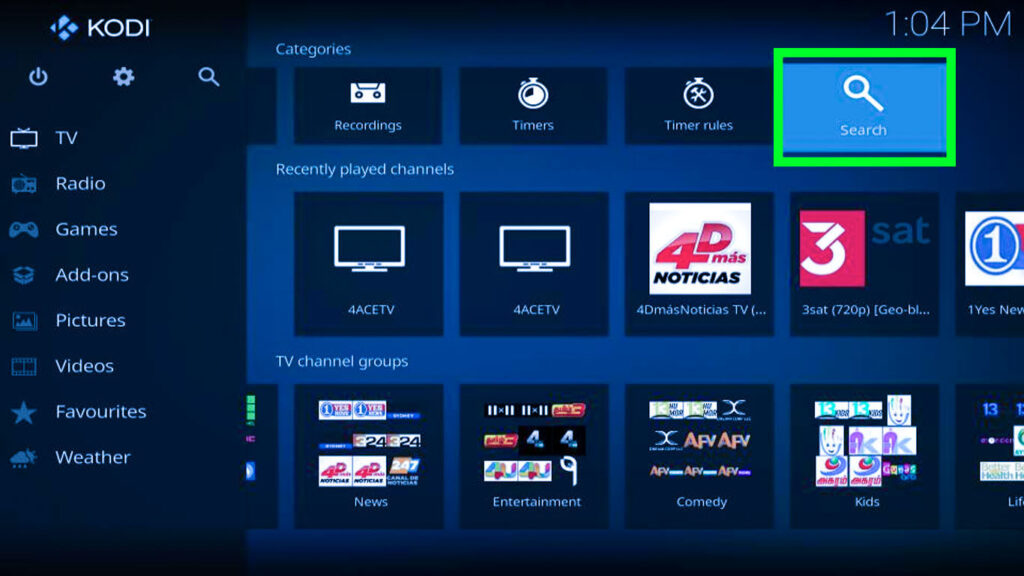
- And then click on the “New Search“.

- Use it within the search guide to the “Channels” tab to find specific/all channels.
Remember, this guide offers general information, and the specific steps might differ slightly depending on your Kodi version. If you encounter any issues, consult the official Kodi resources or seek assistance from your chosen IPTV provider.
Exploring the Best IPTV Addons for Kodi:
While Kodi itself doesn’t provide IPTV channels, several third-party add-ons can elevate your experience. Remember, always exercise caution and choose legal and reputable sources for add-ons to avoid encountering illegal content or malware. Here’s a review of 5 popular IPTV add-ons for Kodi:
1. Mom IPTV – (MomIPTV.com):
- Focus: American channels, including sports and entertainment.
- Pros: User-friendly interface, multiple device compatibility, unlimited cloud DVR storage.
- Cons: Requires internet connection, potential blackout restrictions.
- Pricing: Starts from $14 per month, varying based on the package.
2. Nikon IPTV – (NikonIPTV.me):
- Focus: A wider selection of channels, including local channels in most major markets.
- Pros: Includes live local channels, cheap pricing plans, and multiple device compatibility.
- Cons: Low uptimes, potential blackout restrictions.
- Pricing: Starts from $12 per month.
3. Homeplex IPTV – (HomeplexIPTV.com):
- Focus: Primarily sports channels, offering various packages for different preferences.
- Pros: Vast sports selection, multiple device compatibility, cloud DVR storage.
- Cons: Primarily sports-focused, limited entertainment channels.
- Pricing: Starts from $10 per month, varying based on the package.
4. Forest IPTV – (ForestIPTV.com):
- Focus: Mix of local and international channels, primarily available in Europe.
- Pros: Caters to specific European regions, multiple device compatibility, and cloud DVR storage.
- Cons: Geographically restricted, potential language barriers.
- Pricing: Varies based on the plans though basic starts at $15 for a month.
5. Pilot IPTV – (PilotIPTV.com):
- Focus: Mix of international channels including USA and Canada.
- Pros: User-friendly interface, EPG integration, parental controls, multiple device compatibility.
- Cons: Potential for encountering unreliable sources.
- Pricing: Subscription cost depends on the chosen IPTV plans though basic starts at $15 for a month.
Important Note:
It’s crucial to research the reputation and reliability of any IPTV service before subscribing. Additionally, some providers may have geographical restrictions, so ensure their availability in your location.
Troubleshooting Common IPTV on Kodi Issues:
If you encounter hiccups with your IPTV setup, here are some troubleshooting tips:
- Verify your internet connection: Ensure you have a stable and strong internet connection to support smooth streaming.
- Double-check the M3U playlist URL: Make sure you’ve entered the correct URL provided by your IPTV provider.
- Restart Kodi: Sometimes, a simple restart can resolve minor glitches.
- Seek assistance from your IPTV provider: If the issue persists, contact your IPTV provider for further guidance.
By following these comprehensive instructions and adopting a cautious approach regarding add-on selection, you can successfully set up IPTV on Kodi and unlock a world of live TV and on-demand entertainment, potentially saving money and enjoying greater flexibility in your viewing experience. However, it’s important to reiterate that Kodi itself is not responsible for the legality or content of IPTV services or add-ons. Always prioritize legal and legitimate sources to ensure a safe and enjoyable experience.
Conclusion:
By harnessing the power of IPTV on Kodi, you can unlock a world of live TV and on-demand content, potentially saving money and gaining greater control over your viewing experience. Remember to prioritize legal and legitimate sources throughout the process to ensure a safe and enjoyable journey.
This guide has equipped you with the knowledge and tools to embark on your IPTV adventure with Kodi. So, explore the possibilities, customize your setup, and enjoy the convenience and flexibility that IPTV offers!